Connect NinjaOne (NinjaRMM)
NinjaOne (formerly NinjaRMM) is a remote monitoring and management (RMM) platform for endpoint monitoring, patching, and remote access. Connecting NinjaOne to StackJack gives your AI assistant around 130 NinjaOne tools — devices, organizations, alerts, patching, maintenance mode, scripting, and fleet analytics — all called through StackJack's MCP endpoint. (MCP, the Model Context Protocol, is the open standard that lets AI assistants like Claude, ChatGPT, and Copilot call your MSP tools securely.)
NinjaOne is one of only two connectors (the other is HaloPSA) that offers a choice of two authentication methods:
| Method | Best for | How it works |
|---|---|---|
| Authorization Code (User OAuth) — recommended | Teams that want per-user audit trails | Each team member signs in with their own NinjaOne identity. Actions your AI takes are attributable to the person who ran them. |
| Client Credentials | Single shared service connection | One app-only Client ID and Secret is shared by the whole team. |
⚠ Running scripts and reaching ticket boards requires Authorization Code (OAuth). NinjaOne treats script execution, ticket boards, and various other endpoints as user-context operations and only accepts them from an interactive OAuth token. A Client Credentials machine token has no user context, so
ninja_run_scriptand ticket-board tools fail with auser_context_required(HTTP 403) error no matter whatrunAsvalue you pass — this is a NinjaOne constraint, not a StackJack permission gap. If you want your AI to run scripts or work ticket boards, connect with Authorization Code (User OAuth). Read-only tools work with either method.
Before you begin
- You need the Owner, co-owner, or Administrator role in StackJack to configure connectors. Other team members can't edit connector settings — they use the Your personal sign-ins section of the Connectors page instead (see Per-user connections below).
- You need admin access to NinjaOne (the ability to create API applications under Administration > Apps > API).
- Connecting a connector automatically activates it on the Free plan. You can upgrade to a paid plan at any time from the Connectors page — current pricing is shown in the portal.
- Know your NinjaOne region. StackJack supports US (app.ninjarmm.com), US2 (us2.ninjarmm.com), EU (eu.ninjarmm.com), OC (oc.ninjarmm.com), and CA (ca.ninjarmm.com).
Tip: The same steps below are always available in-app — open Connectors, find the NinjaOne card, and click How To Connect.
Option A: Authorization Code (User OAuth) — recommended
Step 1: Create the OAuth application in NinjaOne
- In NinjaOne, go to Administration > Apps > API and create a new client application.
- Select Web as the Application Platform and Authorization Code as the grant type.
- Under Allowed Grant Types, also select Refresh Token.
⚠ Refresh Token is required. Without the Refresh Token grant, StackJack cannot maintain your connection after the initial access token expires, and you will have to re-authorize repeatedly. StackJack refuses to complete the connection if NinjaOne doesn't return a refresh token, and points you back to this setting.
- Set the Redirect URI to the StackJack OAuth callback URL shown in the connector setup form (you'll copy it in Step 2 — it looks like
https://<your portal address>/connector-callback/ninjarmm). - Select your API region and enable the required API scopes (monitoring, management).
- Copy the Client ID and Client Secret from the application details page.
Step 2: Authorize in StackJack
- In the StackJack portal, go to Connectors and click Configure on the NinjaOne card.
- Set Auth Method to Authorization Code (User OAuth) — Recommended (this is the default for a fresh setup).
- Select your Region — the Instance URL fills in automatically and can't be edited.
- Copy the Redirect URI shown in the dialog and make sure it is registered on your NinjaOne API application (Step 1.4) before continuing.
- Paste the Client ID and Client Secret.
- Click Authorize. You'll be redirected to NinjaOne to sign in and approve access, then returned to StackJack.
When you connect with OAuth, StackJack requests the monitoring and management scopes (plus offline access for token renewal). Scope selection checkboxes are not shown in OAuth mode — the scopes enabled on your NinjaOne application control what's actually granted.
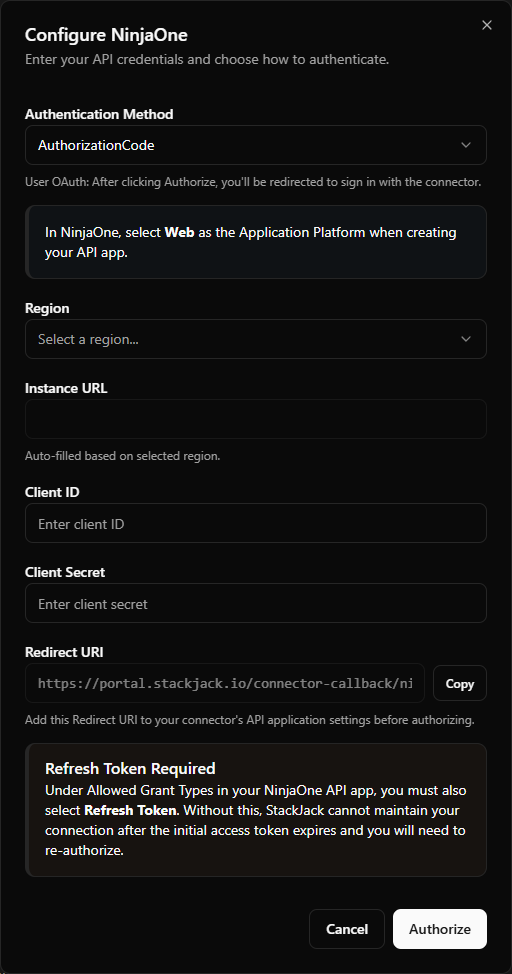 StackJack NinjaOne configure dialog in OAuth mode — region dropdown, copyable Redirect URI row, and the "Refresh Token Required" warning alert
Option B: Client Credentials
Step 1: Create the API application in NinjaOne
- In NinjaOne, go to Administration > Apps > API and create a new client application.
- Select API Services as the Application Platform and Client Credentials as the grant type.
⚠ The Application Platform must be API Services for Client Credentials. (For OAuth it must be Web.) Picking the wrong platform is the most common cause of a failed connection.
- Enable the API scopes you want StackJack to use (see the scope guide below).
- Note your API region.
- Copy the Client ID and Client Secret from the application details page.
Step 2: Save the credentials in StackJack
- In the StackJack portal, go to Connectors and click Configure on the NinjaOne card.
- Set Auth Method to Client Credentials.
- Select your Region — the Instance URL fills in automatically.
- Paste the Client ID and Client Secret.
- Check the API Scopes boxes (Monitoring / Management / Control) to match exactly the scopes you enabled on the NinjaOne application. At least one scope is required. StackJack requests exactly the checked scopes every time it authenticates to NinjaOne, so the checkboxes must mirror the NinjaOne app: checking a scope the app does not have can make authentication fail, and unchecking a scope you do need means the tools that require it fail with permission errors (the tools themselves stay visible in StackJack).
- Click Save.
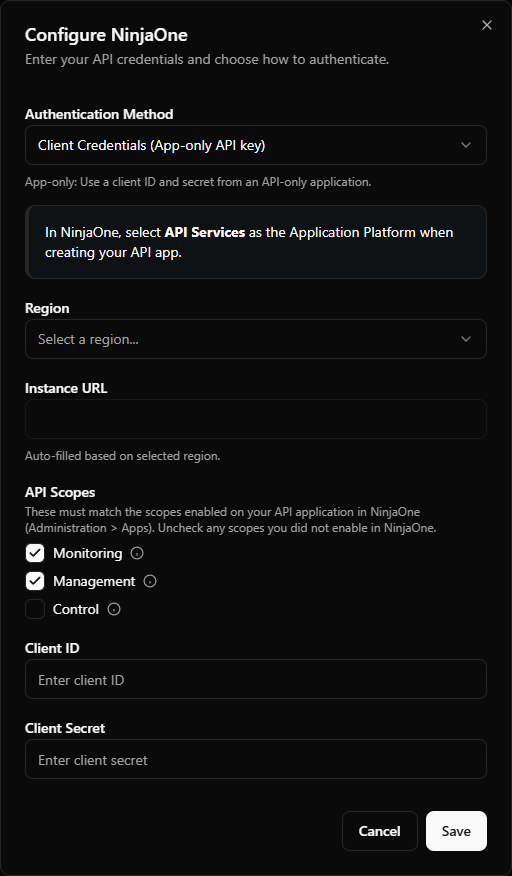 StackJack NinjaOne configure dialog in Client Credentials mode — region dropdown and the three API scope checkboxes with info tooltips
NinjaOne API scopes
| Scope | Access | What it enables in StackJack |
|---|---|---|
| Monitoring (recommended) | Read-only | Devices, organizations, alerts, activities, queries, knowledge-base articles, and fleet analytics dashboards |
| Management (recommended) | Read/write | Device reboots, patch application, maintenance mode, organization creation, policy management, and script execution |
| Control | Remote access | Remote control sessions — no StackJack tools currently use this scope; it's available for future use |
What happens when you save
- Your credentials are stored encrypted in Azure Key Vault. They are never stored in StackJack's database, and the portal never re-displays a saved secret.
- StackJack immediately test-calls NinjaOne to validate the credentials. If validation fails or times out, your credentials are still saved and you'll see a warning — validation retries automatically in the background.
- A Free plan subscription for NinjaOne is activated automatically if you don't already have one.
- If validation keeps failing (three consecutive definitive failures), StackJack auto-disables the connection, emails the tenant owner, and shows Re-enable and Update Credentials buttons on the card.
Per-user connections for team members
With the Authorization Code method, each team member can attach their own NinjaOne identity so tool calls run as them:
- An admin completes the shared OAuth setup above first.
- The team member opens the Connectors page and selects Connect on the NinjaOne card in their Your personal sign-ins section. Members inherit the scopes from the shared setup.
- The member signs in to NinjaOne with their own account and approves access.
- StackJack then shows a one-time credentials page with a personal MCP client (ID + secret) named after the member, for use in their AI tool. The secret is displayed exactly once, and the page expires after 5 minutes — copy it immediately. Any older personal MCP clients the member had for NinjaOne are deactivated at the same time.
Members must have at least one NinjaOne tool assigned to them by an admin before they can connect. If a member's NinjaOne authorization later breaks (for example, a revoked refresh token), their personal sign-in card shows Re-authorize Required with a button to reconnect, and the member receives an email when re-authorizing is the fix.
Troubleshooting
| Symptom | Likely cause and fix |
|---|---|
| Authorization fails with a "missing refresh token" error | The Refresh Token grant type is not enabled on your NinjaOne API app. Enable it under Allowed Grant Types and authorize again. |
| Authorization or token exchange fails outright | Wrong Application Platform: OAuth requires Web, Client Credentials requires API Services. Also confirm the Redirect URI registered in NinjaOne exactly matches the one shown in the StackJack dialog. |
| Tools return permission errors | The scope needed by that tool isn't enabled on the NinjaOne application, or (Client Credentials mode) the checked scopes in StackJack don't match the app. Fix the NinjaOne app scopes, then re-save. |
Scripts or ticket-board tools return user_context_required (403) |
Your connector is authorized with Client Credentials, which NinjaOne won't accept for user-context endpoints (scripts, ticket boards). Reconfigure the NinjaOne connector with Authorization Code (User OAuth) and authorize again — no runAs value works around this. |
| Connection shows Invalid | Click Re-test on the card. If the secret was rotated in NinjaOne, click Update and paste the new secret. |
| Card shows Disabled | StackJack auto-disabled the credential after repeated failures. The card shows the exact error plus a recommended action — fix the cause, then click Re-enable (or Update Credentials first if the secret changed). |
| Wrong region selected | Re-open Configure, pick the correct region, and re-save (OAuth mode: re-authorize). |
Disconnecting
Click Disconnect on the NinjaOne card to delete the stored credentials from Key Vault. Any AI tools using the connector stop working immediately.
⚠ Disconnecting does not cancel a paid plan — billing continues until you cancel it separately. The Cancel Plan button only appears while the connector is connected, so cancel the plan before disconnecting. If you've already disconnected, save your credentials again to bring the plan controls back, then cancel.